101
Applying JavaScript to a Web App
Summary and Objectives
In this activity you will step through methods for changing the browser view of the HTML dynamically with JavaScript programming. You will primarily use variables (as Strings and Arrays), for-loops, and built-in functions to change the browser view.
INSTRUCTIONS
1 - Get the Starter Code
The code below assumes you will use the filenames index.html, style.css, and script.js in the same folder, like the default setup in Repl.it. We will start with an empty JavaScript file (script.js).
HTML
Replace your HTML with the following.
<!DOCTYPE html>
<html>

<head>
    <meta charset="utf-8">
    <meta name="viewport" content="width=device-width">
    <title>repl.it</title>
    <link href="https://use.fontawesome.com/releases/v5.7.2/css/all.css" rel="stylesheet">
    <link href="style.css" rel="stylesheet" type="text/css" />
</head>

<body>
    <div class="app">
        <div class="nav-bar">
            <div class="nav-left">APP NAME</div>
            <div class="nav-right"><i class="fas fa-bars"></i></div>
        </div>
        <div class="main-section">
            <div class="actions">
                <input class="main-input" placeholder="input here" size="30">
                <i class="fas fa-arrow-circle-right"> </i>
            </div>
            <!--------------------------------------->
            <!-- OUR PROGRAM RESULTS WILL GO BELOW -->
            <!--------------------------------------->
            <div class="collection" id="results">
                Nothing to see here yet...
            </div>
            <!--------------------------------------->
            <!--------------------------------------->
            <!--------------------------------------->
        </div>
    </div>
    <script src="script.js"></script>
</body>

</html>
CSS
body {
  margin: 0;
  background: #eee;
}

.nav-bar {
  display: grid;
  grid-template-columns: 1fr 1fr;
  position: sticky;
  top: 0;
  background: black;
  color: white;
  padding: 11px;
  font-size: 22px;
}

.nav-right {
  text-align: right;
}

.actions {
  text-align: center;
  padding: 10px;
  background: lightgray;
  font-size: 20px;
  line-height: 30px;
}

.main-input {
  border: none;
  outline: none;
  border-radius: 99px;
  font-size: 20px;
  line-height: 30px;
  padding: 0px 15px;
}

.collection {
  display: grid;
  grid-template-columns: 1fr 1fr 1fr;
  grid-gap: 10px;
  padding: 11px;
  margin: auto;
  max-width: 900px;
}

.item {
  display: grid;
  background: white;
  box-shadow: 1px 1px 5px black;
}

.item-content {
  border-bottom: 1px solid lightgray;
  height: 150px;
  background-color: #00a;
  color: white;
  padding: 7px;
}

.item-actions {
  display: grid;
  height: 50px;
  justify-items: center;
  align-items: center;
  grid-template-columns: 1fr 1fr 1fr;
}

@media only screen and (max-width: 600px) {
  .collection {
    grid-template-columns: 1fr;
  }
}
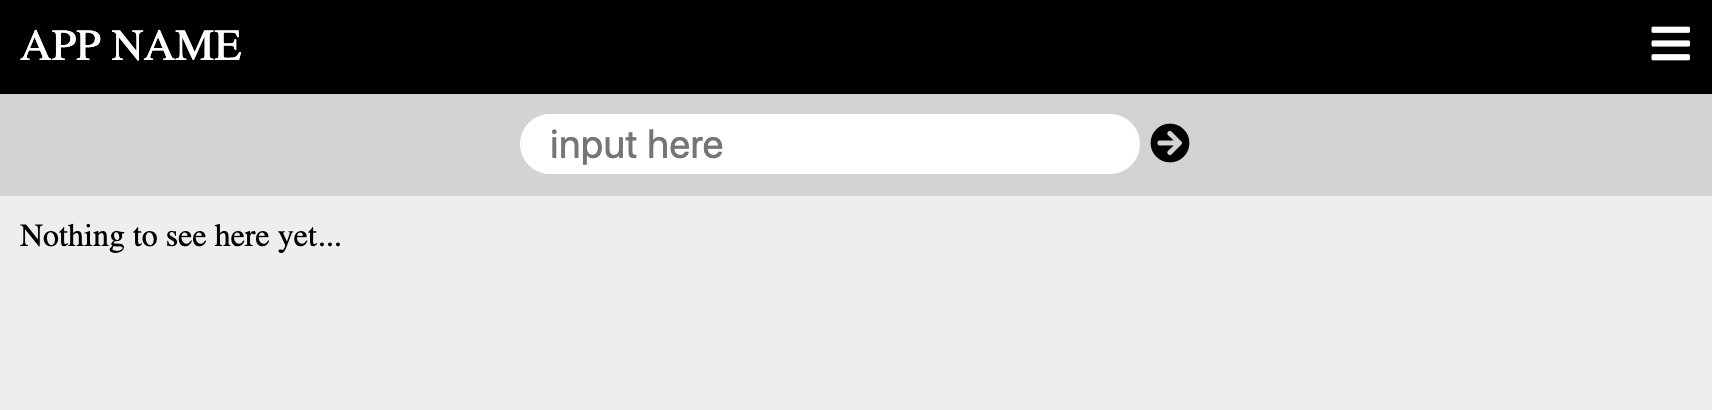
CHECKPOINT
When you run the application in the browser you should see a result similar to the one below.
2 - Use JavaScript to Insert a Line of Text
Notice that are starting code is basically like our last exercise with CSS grids with a subtle difference. Look in your HTML and find the following chunk of code.
<!--------------------------------------->
<!-- OUR PROGRAM RESULTS WILL GO BELOW -->
<!--------------------------------------->
<div class="collection" id="results">
    Nothing to see here yet...
</div>
<!--------------------------------------->
<!--------------------------------------->
<!--------------------------------------->
First of all, those lines that start with <!-- and end with --> are just comments that do not affect the output. Comments just help people looking at the code. You will notice that the div tag for our collection not only has a class, as before, but now has an id of results. ID’s are similar to classes but are intended to identify one element rather than a type (or class) of elements for styling. The id will be used to select an element in the JavaScript to manipulate it.
In your JavaScript (script.js) insert the following line of code and run it.
document.querySelector("#results").innerHTML = "Hello World";
You should see “Hello World” on your web page view now. It has been inserted inside your results element. Let’s break down how that one line of code works.
documentis a JavaScript object that provides many useful methods to work with the HTML (the document). The period.can then be followed with one of many methods or properties for the document.querySelector("#results")is a method to basically go find an HTML element with an id of results. The#denotes an id, just like how you used.in CSS to prefix a class selector.innerHTMLallows you to either read the HTML inside that element or set the HTML to something else. Here we set the HTML to be “Hello World”. Note: Strings (a group of characters) need to have quotations around them.
Go ahead and change the string to something else. You can also use numbers without quotations and even do some math. Try 3 + 2. You should see 5 in your web page view.
3 - Let’s use a Variable
Now replace your line of JavaScript with the following.
var myOutput = "Hello World, again.";

document.querySelector("#results").innerHTML = myOutput;
Here we are creating a variable called myOutput and setting it to “Hello World, again.”. Then we can use the variable name, myOutput to set the innerHTML of our element. It may seem like we actually made things more complicated but variables will prove to be indispensible for you.
A variable’s contents can be changed in the program. Try putting myOutput = "Good Bye."; in between the two lines of code you have. Once you run this in the browser view you will see the latest value of myOutput is what gets displayed.
Notice that we did not use
varthis second time. We only usevarto define something as a variable the first time. After that we just use the name of the variable to refer to it.
We can even use HTML in our variable. Let’s use HTML like we did for our grid items in our last lab. Replace all your JavaScript with the following code. Yep, replace it all with this.
var myOutput = "<div class='item'><div class='item-content'>Look at me.</div></div>";
myOutput += "<div class='item'><div class='item-content'>And me too.</div></div>"
document.querySelector("#results").innerHTML = myOutput;
Once you run this, you should see two grid items displayed. Notice that we used += to add the second element. This operator simply takes the variable’s original value and adds the second value.
Try adding a third element of your own.
By the way, this (
+=) is very useful for creating a number counter too.
So, if we had 200 items to display we could just keep repeating this, but that would be tedious. There is a much more efficent way to do it. Let’s get started with that.
4 - Using an Array
An array can store multiple values in a variable. For example, we could define a list of content that we would like to display in our grid like this:
var myData = ["Go to grocery.", "Call mom.", "Take dog to vet.", "Pay bills."];
document.querySelector("#results").innerHTML = myData[2];
The array uses brackets [ ] with the items listed with commas between. As usual, Strings should have quotation marks, but numbers don’t. We can access the first element in the array like this myData[0], where the 0 is called the index of the array. Array indices start with 0 then count up. So myData[0] would be “Go to grocery” and myData[1] would be “Call mom.” and so on. It takes time to get used to arrays.
Replace all of your Javascript with the following.
var myData = ["Go to grocery.", "Call mom.", "Take dog to vet.", "Pay bills."];
var myOutput = "";

for (var i = 0; i < myData.length; i++) {
  myOutput += "<div class='item'><div class='item-content'>" + myData[i] + "</div></div>";
};

document.querySelector("#results").innerHTML = myOutput;
Recognize that in the for-loop above i is the index that starts at 0 then increments up with each loop by 1 until it is 3 (which is the length of the myData array, 4, minus 1).
Below is another way to loop through an array with the same result. Replace all of your Javascript with the following.
var myData = ["Go to grocery.", "Call mom.", "Take dog to vet.", "Pay bills."];
var myOutput = "";

myData.forEach(function (item){
  myOutput += "<div class='item'><div class='item-content'>" + item + "</div></div>";
});

document.querySelector("#results").innerHTML = myOutput;
Notice that after we define the myData variable, we define myOutput as an empty string. Then we use the forEach method on the myData array to loop through each item in the array one by one. item in the forEach function refers to an individual element of the array, like “Go to grocery”. With each loop we add HTML and the item text to the myOutput variable using the += operator.
After the forEach has looped through all of the array we insert the myOutput contents into the document.
5 - Using a Template Literal
Template literals are very useful, and at first they will seem like the strings we have already been using. But they are much more powerful. Replace all your javascript with the code below.
var myData = ["Go to grocery.", "Call mom.", "Take dog to vet.", "Pay bills."];
var myOutput = "";

myData.forEach(function (item){
  myOutput += `
  <div class="item">
    <div class="item-content">
      ${item}
    </div>
    <div class="item-actions">
      <i class="fas fa-star"></i>
      <i class="fas fa-share"></i>
      <i class="fas fa-trash"></i>
    </div>
  </div>`;
});

document.querySelector("#results").innerHTML = myOutput;
Once you run this in your browser view you should four items in our collection. Let’s identfiy a few things going on with the template literal here.
- We use a template for the variable
myOutputas we cycle through each element in the array. Notice that this uses backticks (`) instead of quotation marks. You can find this character in the upper-lefthand corner of most keyboards. - The template allows you to use several lines with your string, rather than keeping everything on the same line. Which is great for including complex HTML.
- The template also allows us to use expressions like
${myData}to insert a content within the string easily, rather than using+and more quotation marks.
6 - Wrapping Things in a Function
Functions allow us to wrap up chuncks of code that can be reused easily, and it also provides organization to the code. Replace all of your javascript with the code below.
var myData = ["Go to grocery.", "Call mom.", "Take dog to vet.", "Pay bills."];

function render() {
  var myOutput = "";

  myData.forEach(function (item) {
    myOutput += `
      <div class="item">
        <div class="item-content">
          ${item}
        </div>
        <div class="item-actions">
          <i class="fas fa-star"></i>
          <i class="fas fa-share"></i>
          <i class="fas fa-trash"></i>
        </div>
      </div>`;
  });

  document.querySelector("#results").innerHTML = myOutput;
}

render();
We use the render() function here to wrap the code that loops through the array of data and then inserts our structured output into the HTML. After our defined render() function you will find a call to render() at the end to actually execute the function when the web page loads.
Having this function will be useful as you add a feature for the user to submit data to the application.
For the following challenges, https://w3schools.com and https://developer.mozilla.org are good references, but a carefully worded Google search will often lead you right where you need to go.
Challenge A
Program your applicaiton to respond to a user entering data in the HTML input box and display the added content to your site.
- Read the text entered into the web page when the user clicks the arrow (submit) button.
- Hints: Use HTML onclick to call a new function called
submit(). Add an id to the HTML input element so you can use `document.querySelector(‘#something’).value to read the value.
- Hints: Use HTML onclick to call a new function called
- Add the new entry to the
myDataarray.- Hints: Use push() function available with JavaScript Arrays.
- Re-render the output once you have updated the
myDataarray. - Finally clear the input box as a convenience to the user.
Challenge B
Program your application to enable the user to delete an item. No hints here. OK, here’s one. https://love2dev.com/blog/javascript-remove-from-array/. And another … https://www.w3schools.com/jsref/jsref_foreach.asp
Challenge C
Program your application to enable the user to search items using a separate text input, where the search results are a filtered subset of all the items.